Tuesday, May 16, 2017 Eric Richards

Last time, I had started working through Jamis Buck's Mazes for Programmers. I've made quite a lot of progress in the meantime, but haven't managed to keep up with posting about that progress. Today, we're going to work through the meat of Chapter 3, where we'll implement a simplified version of Dijkstra's Algorithm (really a breadth-first search), which we'll use to find paths through our mazes. We will also use this algorithm to help visualize the biases that exist in our two previous maze generation algorithms, by coloring the backgrounds of each cell according to its distance from a starting point.

You can download the code for this post by downloading or cloning the Post_2 branch from my GitHub. Going forward, I'm going to try and tag the code for each post in a new branch - I'm still used to the old SVN model, but I'm trying to figure out how to take advantage of Git a little more.

Below you can see an example of where we'll end up, drawing the longest path through a maze, and coloring each cell according to its distance along the path.

Let's get started!


Sunday, April 09, 2017 Eric Richards

A few weeks back, I picked up a copy of James Buck's Mazes for Programmers: Code Your Own Twisty Little Passages. (The title is, of course, an homage to one of the original text adventure games, Colossal Cave Adventure, or Adventure for short, which featured a maze puzzle where every room was described as "You are in a maze of twisty little passages, all alike"). I read through most of it on my veranda in the mornings, looking out over Long Bay in Antigua while I was on vacation, wishing I had brought my laptop along with me (although my girlfriend is probably happy I did not...). Once I got back, I started diving into implementing some of the ideas from the book - it's been quite a joy, and a much needed break from debugging UCWA applications at the day job.

The code in the book is implemented in Ruby, however, I'm not a Rubyist, so I decided that I'd work through the examples in my language of choice, C#. The code is pretty simple, so porting it over has been pretty straight-forward. I also figured it would be an interesting exercise for trying out some of the newer features in the more recent versions of C# - I've been stuck using C# 5.0 due to some tooling that we haven't had a chance to upgrade yet at work. Today, I'm going to mostly cover the examples from Chapter 2, which lays out the general plumbing of the framework that the rest of the book builds on, and implements two simple maze-building algorithms, the Binary Tree and Sidewinder algorithms. For the full code, you can check out my GitHub repository; things there may change slightly from the version presented here as I work through more of the book, but the general structure should remain similar.


Friday, August 26, 2016 Eric Richards

A little over two years ago, I first saw Amit Patel's article on Polygonal Map Generation, and thought it was incredibly cool. The use of Voronoi regions created a very nice, slightly irregular look, compared to grid-based terrains. At the time, I had just finished up working on my DX11 random terrain code, and it looked like a fun project to try to tackle.

I then proceeded to spend several months messing around with different implementations of Fortune's Algorithm in C# to get started and generate the Voronoi polygons used to generate a terrain along the lines of Amit's example. At this point, I've lost track of all of the different versions that I've sort of melded together to produce the code that I've ended up with in the end, but some of the more influential are:

The original goal was to create a map generator, suitable for a kind of overworld/strategic level map. But, alas, life happened, and I got bogged down before I got that far. I did, however, wind up with a fairly cool tool for generating Voronoi diagrams. Because I had spent so much time trying to iron out bugs in my implementation of the algorithm, I ended up producing a WinForms application that allows you to step through the algorithm one iteration at a time, visualizing the sites that are added to the diagram, the vertices and edges, as well as the position of the beach and sweep lines. Eventually I also worked in options to show the circles through three sites that define where a Voronoi vertex is located, as well as the Delauney triangulation of the sites.

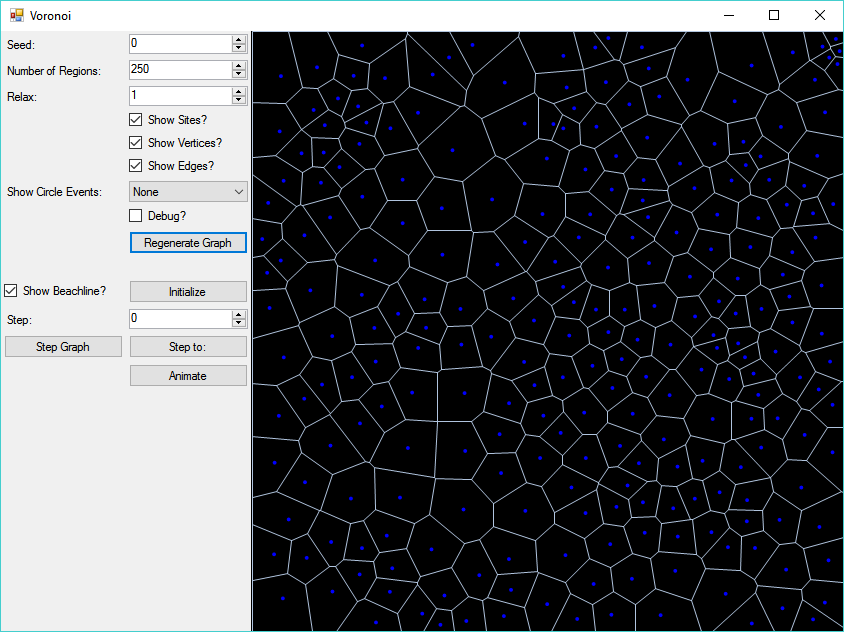
Voronoi regions, with the edges drawn in white, and the sites as the blue points.

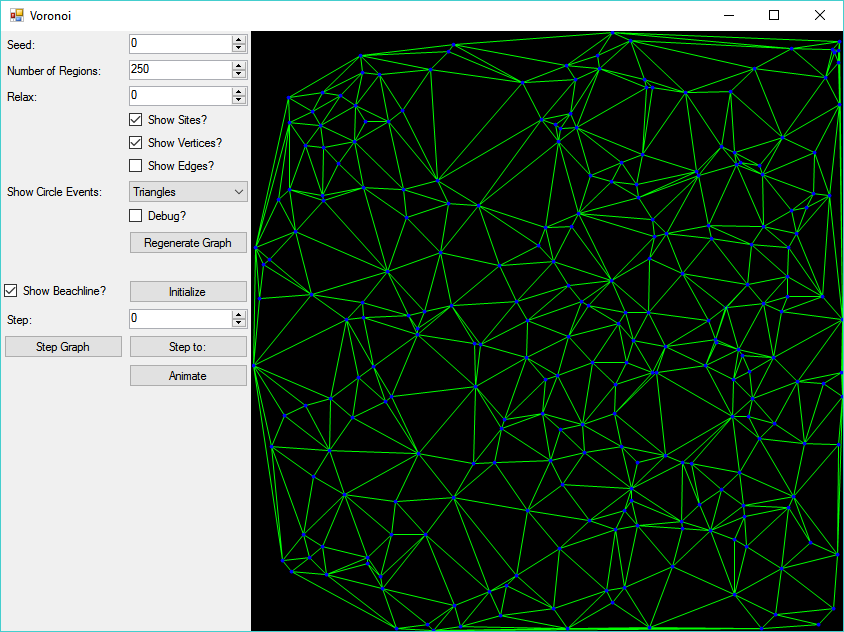
Delauney triangulation, with triangle edges in green.

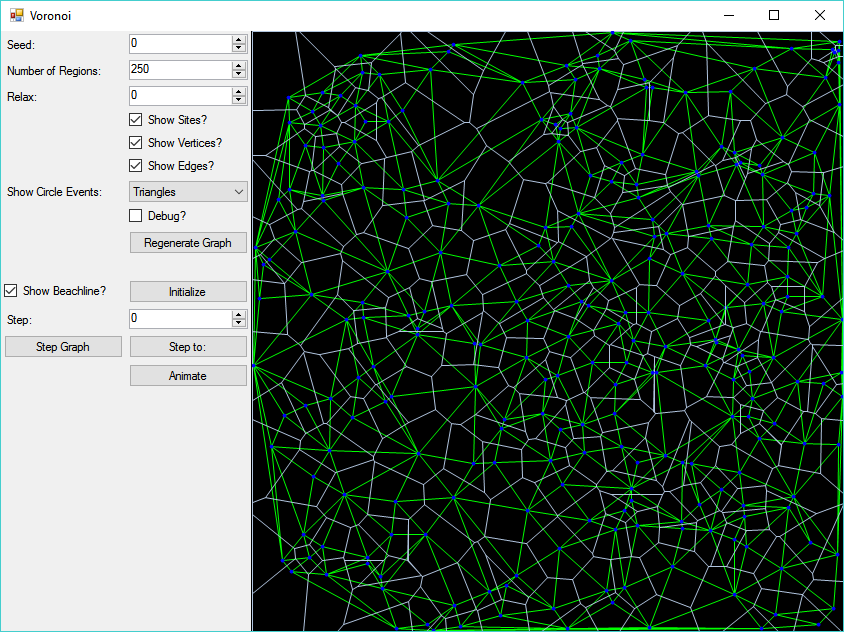
Showing both the Voronoi regions and the Delauney triangles.

I won't pretend that this code is fantastic, but it's kind of interesting, and I worked at it for quite a while, so better to have it out here than moldering on a hard drive somewhere. If you'd like to see the source, it is available on GitHub. You can also download the executable below if you like - I make no promises that it will work everywhere, but it is a pretty standard .Net 4.5 Windows Forms application. I've also got some videos below the fold, if you'd like to see this in action.

 Download Voronoi

Sunday, April 10, 2016 Eric Richards

Alright, ready for the third installment of this ray tracing series? This time, we'll get some actual rays, and start tracing them through a scene. Our scene is still going to be empty, but we're starting to get somewhere. Although the book I'm working from is titled Ray Tracing in One Weekend, it's starting to look like my project is going to be more like Ray Tracing in One Year...

Once again, I'm going to put all of the relevant new code for this segment up here, but if you want to see the bits I've missed, check out my GitHub project. We will be circling back to the Vector3 structure I created last time, since I inevitably left out some useful operations...

The core of what a ray tracer does is to trace rays from an origin, often called the eye, for obvious reasons, through each pixel in the image, and then out into our scene to whatever objects lie beyond. We don't have any objects to actually hit, yet, but we are going to lay the groundwork to start doing that next time. Below, you can see the setup of our eye, the image plane, and the rays that shoot from the eye through the image and into the scene beyond.


Sunday, March 06, 2016 Eric Richards

It's going to take me considerably longer than one weekend to build out a ray tracer...

Last time, I laid the groundwork to construct a PPM image and output a simple gradient image, like the one below.

This time around, I'm going to focus on building some useful abstractions that will make work going forward easier. This is going to focus on two areas:

  • A Vector3 class, which will be helpful for representing 3D points, directional vector, RGB colors and offsets. We'll implement some useful operators and geometric methods in addition.
  • A Bitmap class, which will represent our output raster and handle the details of saving that raster out as a PPM image file.
Ultimately, we'll be producing the same image as in the last installment, but with considerably less boilerplate code, and lay the groundwork for making our lives much easier going forward when we get to some more meaty topics. As always, the full code is available on GitHub, but I'll be presenting the full code for this example in this post.


Bookshelf

Hi, I'm Eric, and I'm a biblioholic. Here is a selection of my favorites. All proceeds go to feed my addiction...